Apache Cocoon 3.0 ALPHA
- 1. Introduction
- 2. Pipelines
- 3. Sitemaps
- 4. Web applications
- 4.1. Usage scenarios
- 4.2. Servlet-Service framework integration
- 4.3. Sitemaps in an HTTP environement
- 4.4. System setup
- 4.5. Connecting pipeline fragments
- 4.6. RESTful web services
- 4.7. Caching and conditional GET requests
- 4.8. Authentication
- 4.9. Testing
- 4.10. Profiling support
- 4.11. Monitoring support
- 4.12. Tutorial
- 5. Wicket Integration
The main idea behind Cocoon is the concept of pipelines. Cocoon 1.x and 2.x applied this idea with a focus on web applications. But sometimes pipelines would be useful although you don't develop a web application. Those former Cocoon versions don't really help you in that case.
In contrast, Cocoon 3 follows a layered approach so that its basic module - the pipeline module - can be used from within any Java environment without requiring you adding a huge stack of dependencies.
On top of this, Cocoon 3 has the goal to make the development of RESTful web services and web applications a simple task.
Cocoon 3 has been built completely from scratch and doesn't have any dependencies on Cocoon 2.x or 1.x.
A Cocoon 3 pipeline expects one or more component(s). These components get linked with each other in the order they were added. There is no restriction on the content that flows through the pipeline.
A pipeline works based on two fundamental concepts:
The first component of a pipeline is of type
org.apache.cocoon.pipeline.component.Starter. The last component is of typeorg.apache.cocoon.pipeline.component.Finisher.In order to link components with each other, the first has to be a
org.apache.cocoon.pipeline.component.Producer, the latterorg.apache.cocoon.pipeline.component.Consumer.
When the pipeline links the components, it merely checks whether the above mentioned interfaces are present. So the
pipeline does not know about the specific capabilities or the compatibility of the components. It is the
responsibility of the Producer to decide whether a specific Consumer
can be linked to it or not (that is, whether it can produce output in the desired format of the Consumer
or not). It is also conceivable that a Producer is capable of accepting different types of
Consumer and adjust the output format
A Cocoon 3 pipeline always goes through the same sequence of components to produce its output. There is no support for conditionals, loops, tees or alternative flows in the case of errors. The reason for this restriction is simplicity and that non-linear pipelines are more difficult (or even impossible) to be cached. In practice this means that a pipeline has to be contructed completely at build-time.
If non-linear XML pipes with runtime-support for conditionals, loops, tees and error-flows are a requirement for you, see the XProc standard of the W3C. There are several available implementations for it.
But let's get more specific by giving an example: Cocoon has become famous for its SAX pipelines that consist
of exactly one SAX-based XML generator, zero, one or more SAX-based XML transformers and exactly one SAX-based
XML serializer. Of course, these specific SAX-based XML pipelines can be build by using general
Cocoon 3 pipelines: generators, transformers and serializers are pipeline components. A generator is a
Starter and a Producer, a transformer can't be neither a
Starter, nor a Finisher but is always a Producer
and a Consumer and a serializer is a Consumer and a Finisher.
Here is some Java code that demonstrates how a pipeline can be utilized with SAX-based XML components:
Pipeline<SAXPipelineComponent> pipeline = new NonCachingPipeline<SAXPipelineComponent>();pipeline.addComponent(new XMLGenerator("<x></x>"));
pipeline.addComponent(new XSLTTransformer(this.getClass().getResource("/test1.xslt")));
pipeline.addComponent(new XSLTTransformer(this.getClass().getResource("/test2.xslt")));
pipeline.addComponent(new XMLSerializer());
pipeline.setup(System.out);
pipeline.execute();

|
Create a |
|
Add a generator, that implements the
The
The
Since a generator is the first component of a pipeline, it also has to implement the |
|
Add a transformer, that implements the
This
Since it implements the
This transformer also implements the |
|
Add another transformer to the pipeline. A pipeline can contain any number of components that implement the |
|
Add a serializer, that implements the
The XML serializer receives SAX events and serializes them into an
A serializer component is the last component of a pipeline and hence it has to implement the
Since it receives SAX events, it implements the |
|
A pipeline has to be initialized first by calling its |
|
After the pipeline has been initialized, it can be executed by invoking its Once the pipeline has been started, it either succeeds or fails. There is no way to react on any (error) conditions. |
Table 2.1. SAX components and their interfaces
| Component type | Structural interfaces | Content-specific interfaces | ||
|---|---|---|---|---|
| SAX generator | Starter, Producer, PipelineComponent | SAXProducer | ||
| SAX transformer | Producer, Consumer, PipelineComponent | SAXProducer, SAXConsumer | ||
| SAX serializer | Finisher, Consumer, PipelineComponent | SAXConsumer |
TBW: noncaching, caching, async-caching, expires caching, own implementations
TBW: Passing parameters to the pipeline and its components, finsih() method
concept, writing custom SAX components, link to Javadocs
explain from a user's point of view, what she needs to do to implement one (available abstract classes)
explain from a user's point of view, what she needs to do to implement one
buffering
StAX pipelines provide an alternative API for writing pipeline components. Altough they are not as fast as SAX, they provide easier state handling as the component can control when to pull the next events. This allows an implicit state rather than have to manage the state in the various content handler methods of SAX.
The most visible difference of StAX components in contrast to SAX is that the component itself has controls the parsing of the input whereas in SAX the parser controls the pipeline by calling the component. Our implementation of StAX pipelines uses just StAX interfaces for retrieving events - the writing interface is proprietary in order to avoid multihreading or continuations. So it is really a hybrid process - the StAX component is called to generate the next events, but it is also allowed to read as much data from the previous pipeline component as it wants. But as the produced events are kept in-memory until a later component pulls for them, the components should not emit large amounts of events during one invocation.
StAXGeneratoris a Starter and normally parses a XML from an InputStream.StAXSerializeris a Finisher and writes the StAX Events to an OutputStream.AbstractStAXTransformeris the abstract base class for new transformers. It simplifies the task by providing a template method for generating the new events.StAXCleaningTransformeris an transformer, which cleans the document from whitespaces and comments.IncludeTransformerincludes the contents of another document.
For further information refer to the javadoc
The StAXGenerator is a Starter component and produces XMLEvents.
import java.io.InputStream; import java.net.URL; import javax.xml.stream.FactoryConfigurationError; import javax.xml.stream.XMLEventReader; import javax.xml.stream.XMLInputFactory; import javax.xml.stream.XMLStreamException; import javax.xml.stream.events.XMLEvent; import org.apache.cocoon.pipeline.SetupException; import org.apache.cocoon.pipeline.component.Starter; public class MyStAXGenerator extends AbstractStAXProducer implements Starter {
|
In order to implement an own |
| The constructor creates a new XMLEventReader for reading from the inputstream. |
|
The pipeline is started using the |
| This method should return true if the generator has a next Event. |
| Returns the next event from the generator. |
| Returns the next event from the generator, without moving actually to the next event. |
Implementing a StAX Transformer should be the most common use case. The AbstractStAXTransformer provides a foundation for new transformers. But in order to write new transformers even simpler, let's describe another feature first:
Navigators allow an easier navigation in the XML document. They also simplify transformers, as usually transformers need only process some parts of the input document and the navigator helps to identify the interesting parts. There are several implementations already included:
FindStartElementNavigatorfinds the start tag with certain properties(name,attribute)FindEndElementNavigatorfinds the end tag with certain properties(name,attribute)FindCorrespondingStartEndElementPairNavigatorfinds both the start and the corresponding end tag.InSubtreeNavigatorfinds whole subtrees, by specifying the properties of the "root" element.
For further information refer to the navigator javadoc
Using a navigator is a rather simple task. The transformer peeks or gets the next event and calls Navigator.fulfillsCriteria - if true is returned the transformer should be process that event somehow.
Creating a new navigator is a rather simple task and just means implementing two methods:
import javax.xml.stream.events.XMLEvent; public class MyNavigator implements Navigator { public boolean fulfillsCriteria(XMLEvent event) {
| This method returns true if the event matches the criteria of the navigator. |
| Returns the result of the last invocation of fulfillsCriteria. |
The next example should show you an transformer featuring navigators and implicit state handling through function calls.
public class DaisyLinkRewriteTransformer extends AbstractStAXTransformer { @Override protected void produceEvents() throws XMLStreamException { while (this.getParent().hasNext()) { XMLEvent event = this.getParent().nextEvent(); if (this.anchorNavigator.fulfillsCriteria(event)) {
| The transformer checks for anchors in the XML. |
| If an anchor is found, it invokes a method which parses the link info if there is any. The additional array is for returning any events, which were read but do not belong to the linkinfo. |
| This method finally writes the start tag with the correct attributes taken from the parsed LinkInfo. |
| The events, which were read but not parsed, are finally added to the output of the transformer. |
| The parser for the linkInfo object uses itself also navigators ... |
| ... and reads more events from the parent. |
The StAXSerializer pulls and serializes the StAX events from the pipeline.
public class NullSerializer extends AbstractStAXPipelineComponent implements StAXConsumer, Finisher { private StAXProducer parent;
| The Finisher has to pull from the previous pipeline component.. |
| In case of StAX the last pipeline component has to start pulling for Events. |
| The serializer pulls the next Event from the previous component and should as next step serialize it. |
| During the pipeline construction the setParent is called to set the previous component of the pipeline. |
| These two methods are defined in the Finisher and allow to set the OutputStream (if the Serializer needs any) and to retrieve the content-type of the result.. |
The StAX pipeline offers interoperability to SAX components to a certain degree. However due their different paradigms only two use cases are currently implemented: Wrapping a SAX component in a StAX pipeline and a StAX-to-SAX pipeline, which starts with StAX components and finishes with SAX.
This allows to use existing SAX components in a StAX pipeline. Beware the overhead of the conversion of StAX->SAX->StAX - so no performance gains from a SAX component can be expected.
Pipeline<StAXPipelineComponent> pipeStAX = new NonCachingPipeline<StAXPipelineComponent>(
| The pipeline uses a |
| In order to embed a single SAX component in a StAX pipeline, the |
| Altough the |
This converter allows to mix StAX and SAX components - but is limited to starting with StAX and then switching to SAX.
Pipeline<PipelineComponent> pipeStAX = new NonCachingPipeline<StAXPipelineComponent>(); pipeStAX.addComponent(new StAXGenerator(input));
| The pipeline starts with a |
| The adapter converts the StAX events to SAX method calls. |
| The |
| The |
In order to use StAX with Java 1.5 an additional dependency is needed in the project's pom.xml.
<dependency>
  <groupId>org.codehaus.woodstox</groupId>
  <artifactId>wstx-asl</artifactId>
  <version>3.2.7</version>
</dependency>
Using woodstox is simpler, as the reference implementation depends on JAXP 1.4, which is not part of Java 1.5.
TBW: Status codes, Conditional GET requests, Mime-type handling
TBW: Logging, JNet, Configuration, Spring integration Deployment: Blocks as deployment units AND Creating a web archive (WAR), Devleopment with Eclispe and Maven
JAX-RS (JSR 311) is the Java standard for the development of RESTful web services. It provides a set of annotations that, when being applied, define resources that are exposed by using Uniform Resource Identifiers (URIs).
The wiki of the Jersey project that provides the Reference Implementation of JAX-RS contains a lot of useful information about how to define REST resources.
The main pieces of the JAX-RS/Cocoon-integration are
the
CocoonJAXRSServletServlet-Service, which is responsible for the JAX-RS integration into the Cocoon Servlet-Service framework, andthe
URLResponseBuilderclass, which allows calling resources provided by other Servlet-Services (usually Cocoon pipelines exposed by sitemaps).
Adding support for JAX-RS services to your Cocoon application requires following three steps:
Add the
cocoon-restmodule as a dependency.Add the
CocoonJAXRSServletServlet-ServiceAdd at least one JAX-RS root resource
The first step is to add the cocoon-rest module to your Cocoon application:
    <dependency>
      <groupId>org.apache.cocoon.rest</groupId>
      <artifactId>cocoon-rest</artifactId>
    </dependency>
Then at least one JAX-RS resource is required:
@Path("/sample")Map<String, Object> data = new HashMap<String, Object>();
data.put("name", "Donald Duck"); data.put("id", id); data.put("reqparam", reqParam); data.put("runningMode", this.settings.getProperty("testProperty")); return URLResponseBuilder.newInstance("servlet:sample:/controller/screen", data)
.build(); } public void setSettings(Settings settings) { this.settings = settings;
} }
| The |
| A JAX-RS root resource. |
| The |
| Again a |
| The |
| The |
| By annotating the |
| By annotating the |
| A map of |
| The In this case the |
| A setter method to allow injecting the |
This resource has to be configured as Spring bean:
<beans xmlns="http://www.springframework.org/schema/beans" xmlns:xsi="http://www.w3.org/2001/XMLSchema-instance" xsi:schemaLocation="http://www.springframework.org/schema/beans http://www.springframework.org/schema/beans/spring-beans-2.5.xsd"> <bean id="org.apache.cocoon.sample.rest.resource.one"
| The |
Finally the Spring bean has to be exposed by the CocoonJAXRSServlet:
<beans xmlns="http://www.springframework.org/schema/beans" xmlns:xsi="http://www.w3.org/2001/XMLSchema-instance" xmlns:servlet="http://cocoon.apache.org/schema/servlet" xsi:schemaLocation="http://www.springframework.org/schema/beans http://www.springframework.org/schema/beans/spring-beans-2.5.xsd http://cocoon.apache.org/schema/servlet http://cocoon.apache.org/schema/servlet/cocoon-servlet-1.0.xsd> <!-- A servlet-service that exposes JAX-RS REST endpoints. --> <bean id="org.apache.cocoon.sample.rest.servlet"
| The |
| The mount path of this Servlet-Service is |
| Connections to other Servlet-Services. |
| A list of JAX-RS resources, which also have to be Spring beans, is exposed. Alternativly a |
A cocoon request goes through many components; while performing a Cocoon request, servlets, sitemaps and pipeline components are being executed. It is also quite common that Cocoon requests are cascaded which makes it sometimes difficult to understand what exactly was happening. Cocoon Profiling enables you to profile any request to your website.
In order to use cocoon-profiling, you simply have to include the cocoon-profiling jar in your classpath.
Cocoon-profiling uses Spring AOP, so no further configuration is needed.
Cocoon-profiling provides several generators for xml and graphical output, which is used by the Firebug plugin. However, you can directly access the data using
yourdomain.com/controller/profiling/{id}for the xml file (xml schema seeprofilingSchema.xsdin cocoon-profiling)yourdomain.com/controller/profiling/{id}.pngfor the graphical representation (example see below)
where {id} is the id of the request. This id (X-Cocoon-Profiling-ID) can be found in the header of the
original request.
This is an example for the graphical representation:
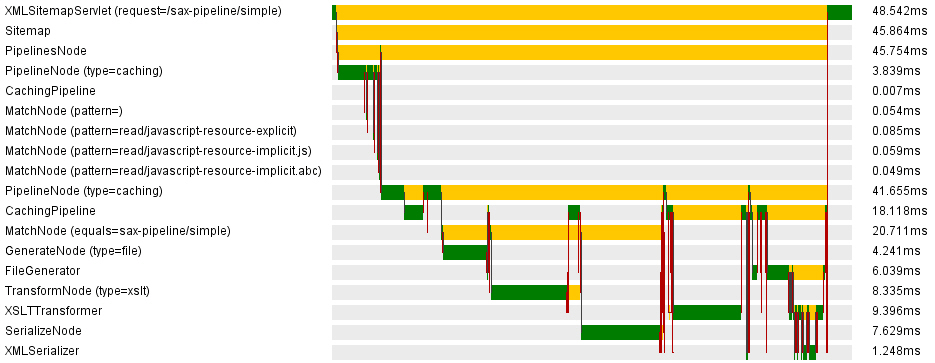
Cocoon-profiling is enabled per default. If you just want to use it, you can skip this section.
If you want to start or stop profiling while the server is running, you can use the management bean provided by cocoon-profiling. Cocoon-monitoring automatically exposes this MBean; just make sure that cocoon-monitoring is in your classpath. You can then connect to the server process using jconsole and call the "start" and "stop" method of the org.apache.cocoon.profiling MBean.
Keep in mind that cocoon-profiling uses Spring AOP to intercept method calls, which cannot be enabled or disabled at runtime. Therefore, a disabled cocoon-profiling still affects the performance (at least a little bit). Only removing cocoon-profiling from the classpath and restarting the server guarantees maximum performance.
Generally, you don't have to change anything. Cocoon-profiling uses Spring AOP to profile all cocoon components and servlets as well as any subclass or cocoon interface implementation.
Advanced users might want to add their own Profiler class to cocoon-profiling if they have a specific component with specific parameters or other bits of data they want cocoon-profiling to collect.
Getting the Firebug Plugin able to work is really easy. You'll need to install Firebug 1.4X from
http://getfirebug.com/releases/firebug/1.4X and then install the Firebug .xpi from
cocoon-profiling-firebug (opening it with Firefox should suffice). The generate the xpi from the sources,
simply switch to the cocoon-profiling-firebug folder and type mvn install. This will
automatically build a new xpi. After installing the plugins, you should have a little bug on the bottom
right corner of your Firefox. Clicking will open it, then you can navigate to the net-panel (you might want
to be sure its activated) and there open up a request (you might need to refresh). In the request, there
should be a tab called "Cocoon 3 Profiling", if you click it, and the Profiling Service works, you should
now see the generated profiling data.
The data itself is presented in two textboxes. The left one is the tree which resembles the .xml that the profiling-component generates, the right one displays the elements, properties, return-values and the profiler of a given (= selected) row in the left tree. You can navigate through the left tree, and based on which row you currently have selected, the right textbox will display the names and values. To add some visual help, pictures are being displayed, based on which kind of element is displayed.
The underline is:
Table 4.1. Icons
 Argument |
 Component |
 Exception |
 Invocation |
 Node |
 Profiler |
 Property |
 Return-value |
 Servlet |
 Sitemap |
You also have two options which can change what you'll be able to see in the Firebug Plugin. These are located on the net Tab Option Panel, which is a little triangle. The options are marked {c3p} and allow you to Show / Hide the Sitemap and to change if the invocations element of the tree is closed or opened. These changes will require a reload, either by reloading your browser, or by clicking the "Reload"-Button in the Profiling Panel.
The other button on the panel will open a new tab in your Firefox in which a graphical outline will be shown which lists your components and the execution time of each of these components. Be aware, though, that the first profiling cycle will present you a kind of wrong picture (it takes a lot longer), because of the java-intern class-loading and other administrative stuff. You'll need to reload the request, not the picture, to change this.
To customize your Firebug Plugin, go to the plugin folder in your Firefox, select the Profiling plugin,
then navigate to chrome\skin\classic\cocoon3profiling.css. In this css, you can change
the heigth and width of the trees and of their columns. Simply navigate to the element you want to change,
and change the value in there.
This module gives you the possibility of monitoring Cocoon 3 applications. It expose a simple API
via Spring JMX MBeans and it can be user via jconsole
or other JMX console.
All module configurations are defined in META-INF/cocoon/spring/cocoon-monitoring.xml.
Each part of module can be enabled or disabled by commenting (or removing) appropriate
entry in configuration file, by default all parts are enabled.
The operation getLoggers() returns a list of all configured Log4j loggers in the
application, it consists of pairs: <class or package name> (category)
=> <logging level>
For doing permanent changes of logging level for particular class or package use the operation
setLoggingLevel(String category, String newLogLevel). Where
Category is name of class or
package with you want to change logging level and newLogLevel
is one of logging level: OFF, INFO,
WARN, ERROR, FATAL,
TRACE, DEBUG, ALL (this parameter
isn't case sensitive, so you can also use lower case names).
For doing temporal changes of logging level for particular class or package use the operation
setLoggingTempoporalLevel(String category, String temporalLogLevel, String
            timeOut)
. First two parameters are same as in setLoggingLevel(),
last one determinate how long this logging level should be used (after that amount of
time logging level would be set back to old level). timeOut parameter
should match regular expression: ^[0-9.]+[dhm]?$, for example if value
of timeOut is set for 1,5h that means that new logging level
would be active for one and half hour.
For loading a completely new configuration file use the operation loadNewConfigurationFile(String path).
This method is capable for both XML and properties configuration
files. There is only one parameter path that should contain absolute path to new
configuration file located locally on the server. Before performning any action that file is validated. First of
all the file extension (there are only two appropriate extensions: *.xml
and *.properties) is checked. The next validation step is different for both files, for
XML files its content is validated against the Log4j DTD or
schema then all output log files are checked that they exist and they are writable.
Properties configuration files are validated that they contain at least one
appender and each output file directory exists and is writable. These validations are done to
prevent Log4j to get into an inconsistent state.
Every single Servlet-Service makes his own node in JXM MBean tree. Such node contains below above functions.
Function getServletServiceMountPaths() returns Servlet-Service mount path.
Function getServletServiceConnections() returns an array of String contains
all connections names for given Servlet-Service. Every connection is represented by:
<short name> => <full qualified bean name>
Function getServletServiceInfo() returns information about Servlet-Service, such as author,
version, and copyright.
This module contains three smaller submodules:
| CacheMonitor |
| CacheBurstActions |
| CacheEntrysMonitor |
This submodule exposes all configured caches on with basic operations on every cache.
Operation listKey() returns list of all CacheKeys that are stored in this particular cache.
If you want remove single cache entry you should use operation removeKey(String), where parameter is
CacheKey name taken from listKey() result. This operation returns true
if it was successes otherwise it return false.
This module add set of operations that can be performed on all caches. You can find and remove all cache entry's which meet certain requirements, specified in operation parameters.
Operation listAllGreatherThen(long) finds all cache entry's in all configured cache's that size (in bytes)
is greather then value passed as a parameter.
Operation listAllSmalledThen(long) finds all cache entry's in all configured cache's that size (in bytes) is
smaller then value passed as a parameter.
Operation listAllOlderThen(String) finds all cache entry's in all configured cache's that are older then
value specified in a parameter. Parameter value must match regular expression: ^\d+[smhd]$ where each
letter stands for:
| s - second |
| m - minutes |
| h - hours |
| d - days |
Operation listAllYoungerThen(String) finds all cache entry's in all configured cache's that are younger
then value specified in a parameter. For parameter description see listAllOlderThen(String).
If you want to get more flexibility searching you can use list(long, long, String, String, Sting, Sting).
First two long parameters limits cache entry's size, their minimum and maximum size. Second two
String parameters limits cache entry minimum and maximum age (syntax is same as in
listAllOlderThen(Sting) and listAllYoungerThen(String) functions). Last two
String parameters are applicable only to ExpiresCacheKey instances and they limit
result entry's on minimum and maximum experience time of entry. Every result entry meets all limitations. For excluding one
(or more) limitation you must pas value -1 for long parameters and null or empty
String for rest parameters.
Operation clearAllGreatherThen(long) perform same search action as listAllGratherThen(long)
but it removes cache entry's that fulfilled requirements instead of listing them. It will return true if
every cache entry was successfully removed, after first failure of removing cache entry this operation will stop and return
false.
Operation clearAllSmallerThen(long) perform same search action as listAllSmallerThen(long)
but it removes cache entry's that fulfilled requirements instead of listing them. It will return true if
every cache entry was successfully removed, after first failure of removing cache entry this operation will stop and return
false.
Operation clearAllOlderThen(String) perform same search action as listAllOlderThen(String)
but it remove cache etry's that fulfilled requirements instead of listing them, this operation also require same parameter schema
as in listAllOlderThen(String). It will return true if every cache entry was successfully
removed, after first failure of removing cache entry this operation will stop and return
false.
Operation clearAllYoungerThen(String) perform same search action as listAllYoungerThen(String)
but it remove cache etry's that fulfilled requirements instead of listing them, this operation also require same parameter schema
as in listAllYoungerThen(String). It will return true if every cache entry was successfully
removed, after first failure of removing cache entry this operation will stop and return
false.
Operation clear(long, long, String, String, String, String) perform same search action and takes same parameters
as described above list(long, long, String, String, String) please see it if you are looking for detailed description.
You can add your own burst actions. It is very simple, just obtain instance of org.apache.cocoon.monitoring.cache.CacheBurstActions
from the container and you can perform any action on cache entry's using performActionOnCaches(long, long, String, String,
String, String, CacheAction) method. Meaning of each parameter in this method is same as in list(long, long, String,
String, String, String) and clear(long, long, String, String, String, String) methods, but there is one
additional parameter, it is implementation of CacheAction interface. This interface has only one method
performAction(Cache, CacheKey) and it will be executed on every cache entry that match passed parameters.
This module enables overview of cache entry's that are connected with specified pipeline. This module will only publish cache entry's for
those pipeline's that had jmx-group-id parameter set for unique value/name. This module also require additional refresh
action, it can be performed by user or it can be executed in some period of time eg every one minute. Behavior of refresh action can be
configured by CacheEntrysMonitorInitializer constructor parameter or on JMX.
AutoRefresh action can be enabled and disabled during runtime. This action will register new MBeans
that are connected with new cache entry's and unregister old MBeans that was connected with expired or removed
cache entry's.
For enable AutoRefresh action call operation enableAutoRefresh(long) where long
parameter is period time (in millisecond) between each refresh. This operation will stop previously configured AutoRefresh
action and run new with new time period.
Operation disableAutoRefresh() will stops actual running AutoRefresh action.
On each published cache entry you can perform that set of actions:
Operation getCacheKey() will return CacheKey connected with that entry.
Operation setCacheValue(String) will set new value of this cache entry.
Apache Wicket has become on of the most popular web frameworks of these days. Especially developers with a strong Java background benefit from its Java-centric approach because all object-oriented features can be applied. This results in highly reusable code.
On the other side Cocoon implementing the pipe/filter pattern has its merits in the field of generating resources in different output formats.
The Cocoon-Wicket integration module bridges between those two web application frameworks in order to use the strenghts of both. This integration supports the integration of Cocoon into Wicket as well as the integration of Wicket into Cocoon.
Note: This is not an introduction into Apache Wicket. This documentation explains to the experienced Wicket user what needs to be done to integrate Cocoon 3 into a Wicket application.
The integration of Cocoon into Wicket is available in several ways:
A Cocoon sitemap can be mounted as
IRequestTargetUrlCodingStrategyA single Cocoon pipeline can be mounted as
IRequestTargetUrlCodingStrategy(not implemented yet)A CocoonSAXPipeline Wicket component can be added to a
WebPage
Whatever approach is chosen, the first step is adding cocoon-wicket and all
its transitive dependencies to your project's classpath:
<dependency>
  <groupId>org.apache.cocoon.wicket</groupId>
  <artifactId>cocoon-wicket</artifactId>
  <version>3.0.0-alpha-2</version>
</dependency>
Mounting in the context of Wicket means a class implementing IRequestTargetUrlCodingStrategy
is added to a Wicket web application. This interface is implemented by CocoonSitemap:
import org.apache.cocoon.wicket.target.CocoonSitemap; import org.apache.wicket.protocol.http.WebApplication; public class SomeWebApplication extends WebApplication { @Override protected void init() { ... this.mount(new CocoonSitemap("/sitemap", "/sitemap.xmap.xml"));
|
The first parameter is the mount path which is a part of the request URI that should be
handled by |
Additionally you have to make sure that all Spring bean definitions provided by the Cocoon modules are
loaded into the web application's Spring application context. Cocoon's own bean definitions are located in
META-INF/cocoon/spring/*.xml.
The simplest solution for this task is referring to the Cocoon Spring Configurator in your main Spring application context,
which is usually located in [servlet-context-base-directory]/WEB-INF/applicationContext.xml. It will
automatically load all bean definitions located in META-INF/cocoon/spring/*.xml of all libraries
on the classpath.
The
Cocoon Spring Configurator documentation contains further details.
Note that the Spring Configurator is one of the transitive dependencies of cocoon-wicket.
That's it! Everything else is the same as using Cocoon 3 outside of Wicket except that the
servlet:/ protocol won't work in this environment.
NOTE: This hasn't been implemented yet!
Mounting a Cocoon pipeline follows the same idea as mounting a whole sitemap. However, it's only a single pipeline that is added to Wicket's URI path and that this can be done without having to write any XML.
All that needs to be done is subclassing from org.apache.cocoon.wicket.AbstractCocoonPipeline
and implementing its addComponents method:
import com.mycompany.MyCocoonPipeline; import org.apache.wicket.protocol.http.WebApplication; public class SomeWebApplication extends WebApplication @Override protected void init() { ... this.mount(new MyCocoonPipeline("/my-pipeline"));
| The only parameter is the path where the pipeline should be be mounted by Wicket. |
In MyCocoonPipeline all that needs to be done is subclassing from
org.apache.cocoon.wicket.AbstractCocoonPipeline and implementing its abstract method
addComponents:
package com.mycompany; import org.apache.cocoon.wicket.AbstractCocoonPipeline; import org.apache.wicket.protocol.http.WebApplication; public class MyCocoonPipeline extends org.apache.cocoon.wicket.AbstractCocoonPipeline<SAXPipelineComponent> @Override protected void addComponents() {
| Add all pipeline components that are required. |
The third alternative of using Cocoon in Wicket is adding a Cocoon pipeline as
WebComponent.
This is as simple as instantiating CocoonSAXPipeline and adding
all generators and transformers that are required:
import org.apache.cocoon.pipeline.NonCachingPipeline; import org.apache.cocoon.sax.SAXPipelineComponent; import org.apache.cocoon.sax.component.StringGenerator; import org.apache.cocoon.sax.component.XSLTTransformer; import org.apache.cocoon.wicket.CocoonSAXPipeline; import org.apache.wicket.markup.html.WebPage; public class Homepage extends WebPage { public Homepage() { CocoonSAXPipeline pipeline = new CocoonSAXPipeline("cocoon-pipeline-component",
| Instantiate the component |
| Adding SAX pipeline components |
The pipeline's result is added to the HTML produced by this page. This is the reason why only generators and transformers can be added to this component because the pipeline is always serialized as XHTML. An XHTMLSerializer is added implicitly to each pipeline.
Note: The integration of Wicket into Cocoon os mostly a proof of concept. It is experimental and has neither been optimized nor tested yet.
The integration of Wicket into Cocoon means that the output of Wicket is added to the content stream of a pipeline. The currently available solution is a reader but alternatively a generator or a transformer would offer an even more alternatives.
As pointed out for the Wicket-Cocoon integration, the first step in every case is adding cocoon-wicket and all
its transitive dependencies to your project's classpath:
<dependency>
  <groupId>org.apache.cocoon.wicket</groupId>
  <artifactId>cocoon-wicket</artifactId>
  <version>3.0.0-alpha-2</version>
</dependency>
By using the Wicket reader a servlet request is referred to a Wicket web application. The current implementation expects exactly one Wicket web application being available as Spring bean:
<beans>
  <bean id="wicketWebapp"
    class="com.mycompany.MyWicketWebapp"/>
</beans>
By adding the bean definition file as resource into META-INF/cocoon/spring the
Wicket web application bean will be loaded automatically.
Then the Wicket reader has be to used in the sitemap:
<map:sitemap> <map:pipelines> <map:pipeline type="noncaching"> <map:match wildcard="my-wicket-app/**"> <map:read type="wicket" base-path="/my-wicket-app" />
|
Use a |
|
The name of the reader is |