
Your first XML pipeline (publishing)
This tutorial is based on the "Your first Cocoon application using Maven 2" guide which shows how to bootstrap a Cocoon project.
In this tutorial you will
- get an overview of what Cocoon pipelines and sitemaps are
- create your first pipeline that emits XML
- enhance this first pipeline by adding an XML transformation step based on XSLT that produces HTML as output
- write a pipeline that creates a PDF document
Overview
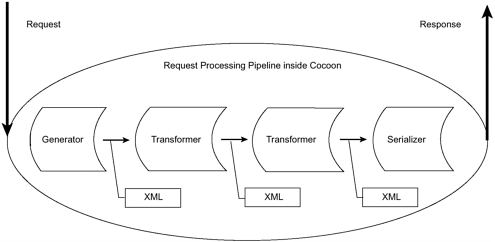
Cocoon is based around the concept of pipelines: If a request comes in, a generator produces SAX events that represent the XML, tranformers can alter the stream of SAX events and a serializer finally creates an output stream which is sent to the client. Sitemaps are used to define those pipelines and connect them with requests. These connections are defined by some kind of rules. In the context of Cocoon those rules are named matchers. Whenever one of those rules (matcher) matches, a pipeline is executed.
Create a pipeline in the sitemap
First, open src\main\resources\COB-INF\sitemap.xmap in your favorite XML editor. That's your block's base sitemap. There are already some pipelines there (/sitemap/pipelines) but for the sake of this tutorial, let's create your own pipeline.<map:sitemap xmlns:xsi="http://www.w3.org/2001/XMLSchema-instance"
xsi:schemaLocation="http://apache.org/cocoon/sitemap/1.0
http://cocoon.apache.org/schema/sitemap/cocoon-sitemap-1.0.xsd"
xmlns:map="http://apache.org/cocoon/sitemap/1.0">
<map:pipelines>
<map:pipeline>
<map:match pattern="myFirstPipeline">
<map:generate src="myXmlFile.xml" type="file"/>
<map:serialize type="xml"/>
</map:match>
</map:pipeline>
[...]
</map:pipelines>
</map:sitemap>
<?xml version="1.0" encoding="UTF-8"?>
<content>test</content>
After saving the sitemap and the XML file, you can point you browser to http://localhost:8888/myBlock1/myFirstPipeline and you will see the output of your first own pipeline serialized as XML (<map:serialize type="xml"/>).
Adding an XSLT transformation step
The first pipeline wasn't really exciting, just reading some XML file and serializing it without changing anything. The second example will add a transformation step based on XSLT:
<map:sitemap xmlns:xsi="http://www.w3.org/2001/XMLSchema-instance"
 xsi:schemaLocation="http://apache.org/cocoon/sitemap/1.0
  http://cocoon.apache.org/schema/sitemap/cocoon-sitemap-1.0.xsd"
 xmlns:map="http://apache.org/cocoon/sitemap/1.0">

  <map:pipelines>
    <map:pipeline>
      <map:match pattern="myFirstPipeline">
        <map:generate src="myXmlFile.xml" type="file"/>
        <map:serialize type="xml"/>
      </map:match>
      <map:match pattern="mySecondPipeline">
        <map:generate src="myXmlFile.xml" type="file"/>
        <map:transform src="myXsltFile.xslt" type="xslt"/>
        <map:serialize type="html"/>
      </map:match>
    </map:pipeline>
    [...]
  </map:pipelines>

</map:sitemap>
The XSLT file is very simple and creates an XML following the structure of XHTML (though without using any namespaces in order to keep things simple):
<?xml version="1.0" encoding="UTF-8"?>
<xsl:stylesheet version="1.0" xmlns:xsl="http://www.w3.org/1999/XSL/Transform">
  <xsl:template match="/">
    <html>
      <head>
        <title>My second XML Pipeline</title>
      </head>
      <body>
        My second XML Pipeline:
        <xsl:value-of select="/content"/>
      </body>
    </html>
  </xsl:template>
</xsl:stylesheet>
After saving the sitemap and the XSLT file, you can point you browser to http://localhost:8888/myBlock1/mySecondPipeline and you will see the output, this time its HTML because of the use of the HTML serializer.
When Cocoon developers talk about pipelines, they mean a series of a matcher that includes at least a generator and a serializer. Transformers and other sitemap components are optional.
Creating a PDF
The first example created XML and the second one HTML. One of the strength of Cocoon is that it makes it very simple to support many different output formats. The result of this third example will be a PDF, again based on myXmlFile.xml:
<map:sitemap xmlns:xsi="http://www.w3.org/2001/XMLSchema-instance"
 xsi:schemaLocation="http://apache.org/cocoon/sitemap/1.0
  http://cocoon.apache.org/schema/sitemap/cocoon-sitemap-1.0.xsd"
 xmlns:map="http://apache.org/cocoon/sitemap/1.0">

  <map:pipelines>
    <map:pipeline>
      <map:match pattern="myFirstPipeline">
        <map:generate src="myXmlFile.xml" type="file"/>
        <map:serialize type="xml"/>
      </map:match>
      <map:match pattern="mySecondPipeline">
        <map:generate src="myXmlFile.xml" type="file"/>
        <map:transform src="myXsltFile.xslt" type="xslt"/>
        <map:serialize type="html"/>
      </map:match>
      <map:match pattern="myThirdPipeline">
        <map:generate src="myXmlFile.xml" type="file"/>
        <map:transform src="myXml2PdfFile.xslt" type="xslt"/>
        <map:serialize type="fo2pdf"/>
      </map:match>
    </map:pipeline>
    [...]
  </map:pipelines>

</map:sitemap>
This pipeline needs a different XSLT file which transforms the XML of myXmlFile.xml to some XML that can be used by FOP to create PDF:
<?xml version="1.0"?>
<xsl:stylesheet version="1.0"
  xmlns:xsl="http://www.w3.org/1999/XSL/Transform"
  xmlns:fo="http://www.w3.org/1999/XSL/Format">

  <xsl:template match="/">
    <fo:root xmlns:fo="http://www.w3.org/1999/XSL/Format">
      <fo:layout-master-set>
        <fo:simple-page-master master-name="page"
          page-height="29.7cm"
          page-width="21cm"
          margin-top="1cm"
          margin-bottom="2cm"
          margin-left="2.5cm"
          margin-right="2.5cm">
          <fo:region-before extent="3cm"/>
          <fo:region-body margin-top="3cm"/>
          <fo:region-after extent="1.5cm"/>
        </fo:simple-page-master>

        <fo:page-sequence-master master-name="all">
          <fo:repeatable-page-master-alternatives>
            <fo:conditional-page-master-reference
             master-reference="page" page-position="first"/>
          </fo:repeatable-page-master-alternatives>
        </fo:page-sequence-master>
      </fo:layout-master-set>

      <fo:page-sequence master-reference="all">
        <fo:static-content flow-name="xsl-region-after">
          <fo:block text-align="center"
            font-size="10pt"
            font-family="serif"
            line-height="14pt">page <fo:page-number/></fo:block>
        </fo:static-content>

        <fo:flow flow-name="xsl-region-body">
          <fo:block font-size="36pt" space-before.optimum="24pt"
           text-align="center">
             My second XML Pipeline
          </fo:block>
          <fo:block font-size="12pt" space-before.optimum="12pt"
           text-align="center">
           <xsl:value-of select="/content"/>
          </fo:block>
        </fo:flow>
      </fo:page-sequence>
    </fo:root>
  </xsl:template>
</xsl:stylesheet>
You also have to use a different serializer for this example, a serializer that can use the XML created by the stylesheet and produce PDF based on it. Cocoon ships this serializer as part of the FOP block. Since the block that you created probably doesn't have the FOP block added as dependency, this has to be done before you can test your pipeline. Adding a block requires editing the pom.xml of your block:
  <dependencies>
    [...]
    <dependency>
      <groupId>org.apache.cocoon</groupId>
      <artifactId>cocoon-fop-impl</artifactId>
      <version>1.0.0</version>
    </dependency>
    [...]
  </dependencies>
Rebuild your block
mvn compile
and start the servlet container again:
mvn jetty:run
Now you can point your browser at http://localhost:8888/myBlock1/myThirdPipeline and you will get a PDF as result.