TBW: Status codes, Conditional GET requests, Mime-type handling
TBW: Logging, JNet, Configuration, Spring integration Deployment: Blocks as deployment units AND Creating a web archive (WAR), Devleopment with Eclispe and Maven
JAX-RS (JSR 311) is the Java standard for the development of RESTful web services. It provides a set of annotations that, when being applied, define resources that are exposed by using Uniform Resource Identifiers (URIs).
The wiki of the Jersey project that provides the Reference Implementation of JAX-RS contains a lot of useful information about how to define REST resources.
The main pieces of the JAX-RS/Cocoon-integration are
the CocoonJAXRSServlet Servlet-Service, which is responsible for
the JAX-RS integration into the Cocoon Servlet-Service framework, and
the URLResponseBuilder class, which allows calling resources
provided by other Servlet-Services (usually Cocoon pipelines exposed by sitemaps).
Adding support for JAX-RS services to your Cocoon application requires following three steps:
Add the cocoon-rest module as a dependency.
Add the CocoonJAXRSServlet Servlet-Service
Add at least one JAX-RS root resource
The first step is to add the cocoon-rest module to your Cocoon application:
    <dependency>
      <groupId>org.apache.cocoon.rest</groupId>
      <artifactId>cocoon-rest</artifactId>
    </dependency>
Then at least one JAX-RS resource is required:
@Path("/sample")public class SampleRestResource {
private Settings settings; @GET
@Path("/parameter-passing/{id}")
public Response anotherService( @PathParam("id") String id,
@QueryParam("req-param") String reqParam,
@Context UriInfo uriInfo,
@Context Request request) {
Map<String, Object> data = new HashMap<String, Object>();
data.put("name", "Donald Duck"); data.put("id", id); data.put("reqparam", reqParam); data.put("runningMode", this.settings.getProperty("testProperty")); return URLResponseBuilder.newInstance("servlet:sample:/controller/screen", data)
.build(); } public void setSettings(Settings settings) { this.settings = settings;
} }
| The |
| A JAX-RS root resource. |
| The |
| Again a |
| The |
| The |
| By annotating the |
| By annotating the |
| A map of |
| The In this case the |
| A setter method to allow injecting the |
This resource has to be configured as Spring bean:
<beans xmlns="http://www.springframework.org/schema/beans" xmlns:xsi="http://www.w3.org/2001/XMLSchema-instance" xsi:schemaLocation="http://www.springframework.org/schema/beans http://www.springframework.org/schema/beans/spring-beans-2.5.xsd"> <bean id="org.apache.cocoon.sample.rest.resource.one"
| The |
Finally the Spring bean has to be exposed by the CocoonJAXRSServlet:
<beans xmlns="http://www.springframework.org/schema/beans" xmlns:xsi="http://www.w3.org/2001/XMLSchema-instance" xmlns:servlet="http://cocoon.apache.org/schema/servlet" xsi:schemaLocation="http://www.springframework.org/schema/beans http://www.springframework.org/schema/beans/spring-beans-2.5.xsd http://cocoon.apache.org/schema/servlet http://cocoon.apache.org/schema/servlet/cocoon-servlet-1.0.xsd> <!-- A servlet-service that exposes JAX-RS REST endpoints. --> <bean id="org.apache.cocoon.sample.rest.servlet"
| The |
| The mount path of this Servlet-Service is |
| Connections to other Servlet-Services. |
| A list of JAX-RS resources, which also have to be Spring beans, is exposed. Alternativly a |
A cocoon request goes through many components; while performing a Cocoon request, servlets, sitemaps and pipeline components are being executed. It is also quite common that Cocoon requests are cascaded which makes it sometimes difficult to understand what exactly was happening. Cocoon Profiling enables you to profile any request to your website.
In order to use cocoon-profiling, you simply have to include the cocoon-profiling jar in your classpath.
Cocoon-profiling uses Spring AOP, so no further configuration is needed.
Cocoon-profiling provides several generators for xml and graphical output, which is used by the Firebug plugin. However, you can directly access the data using
yourdomain.com/controller/profiling/{id} for the xml file (xml schema see
profilingSchema.xsd in cocoon-profiling)
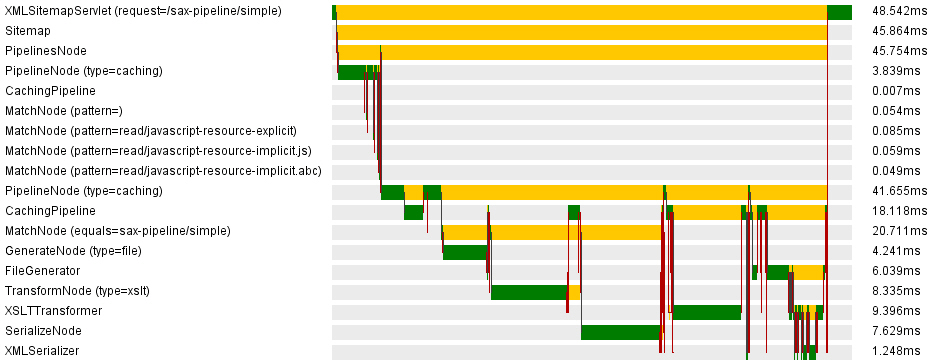
yourdomain.com/controller/profiling/{id}.png for the graphical representation (example see below)
where {id} is the id of the request. This id (X-Cocoon-Profiling-ID) can be found in the header of the
original request.
This is an example for the graphical representation:
Cocoon-profiling is enabled per default. If you just want to use it, you can skip this section.
If you want to start or stop profiling while the server is running, you can use the management bean provided by cocoon-profiling. Cocoon-monitoring automatically exposes this MBean; just make sure that cocoon-monitoring is in your classpath. You can then connect to the server process using jconsole and call the "start" and "stop" method of the org.apache.cocoon.profiling MBean.
Keep in mind that cocoon-profiling uses Spring AOP to intercept method calls, which cannot be enabled or disabled at runtime. Therefore, a disabled cocoon-profiling still affects the performance (at least a little bit). Only removing cocoon-profiling from the classpath and restarting the server guarantees maximum performance.
Generally, you don't have to change anything. Cocoon-profiling uses Spring AOP to profile all cocoon components and servlets as well as any subclass or cocoon interface implementation.
Advanced users might want to add their own Profiler class to cocoon-profiling if they have a specific component with specific parameters or other bits of data they want cocoon-profiling to collect.
Getting the Firebug Plugin able to work is really easy. You'll need to install Firebug 1.4X from
http://getfirebug.com/releases/firebug/1.4X and then install the Firebug .xpi from
cocoon-profiling-firebug (opening it with Firefox should suffice). The generate the xpi from the sources,
simply switch to the cocoon-profiling-firebug folder and type mvn install. This will
automatically build a new xpi. After installing the plugins, you should have a little bug on the bottom
right corner of your Firefox. Clicking will open it, then you can navigate to the net-panel (you might want
to be sure its activated) and there open up a request (you might need to refresh). In the request, there
should be a tab called "Cocoon 3 Profiling", if you click it, and the Profiling Service works, you should
now see the generated profiling data.
The data itself is presented in two textboxes. The left one is the tree which resembles the .xml that the profiling-component generates, the right one displays the elements, properties, return-values and the profiler of a given (= selected) row in the left tree. You can navigate through the left tree, and based on which row you currently have selected, the right textbox will display the names and values. To add some visual help, pictures are being displayed, based on which kind of element is displayed.
The underline is:
Table 4.1. Icons
 Argument |
 Component |
 Exception |
 Invocation |
 Node |
 Profiler |
 Property |
 Return-value |
 Servlet |
 Sitemap |
You also have two options which can change what you'll be able to see in the Firebug Plugin. These are located on the net Tab Option Panel, which is a little triangle. The options are marked {c3p} and allow you to Show / Hide the Sitemap and to change if the invocations element of the tree is closed or opened. These changes will require a reload, either by reloading your browser, or by clicking the "Reload"-Button in the Profiling Panel.
The other button on the panel will open a new tab in your Firefox in which a graphical outline will be shown which lists your components and the execution time of each of these components. Be aware, though, that the first profiling cycle will present you a kind of wrong picture (it takes a lot longer), because of the java-intern class-loading and other administrative stuff. You'll need to reload the request, not the picture, to change this.
To customize your Firebug Plugin, go to the plugin folder in your Firefox, select the Profiling plugin,
then navigate to chrome\skin\classic\cocoon3profiling.css. In this css, you can change
the heigth and width of the trees and of their columns. Simply navigate to the element you want to change,
and change the value in there.
This module gives you the possibility of monitoring Cocoon 3 applications. It expose a simple API
via Spring JMX MBeans and it can be user via jconsole
or other JMX console.
All module configurations are defined in META-INF/cocoon/spring/cocoon-monitoring.xml.
Each part of module can be enabled or disabled by commenting (or removing) appropriate
entry in configuration file, by default all parts are enabled.
The operation getLoggers() returns a list of all configured Log4j loggers in the
application, it consists of pairs: <class or package name> (category)
=> <logging level>
For doing permanent changes of logging level for particular class or package use the operation
setLoggingLevel(String category, String newLogLevel). Where
Category is name of class or
package with you want to change logging level and newLogLevel
is one of logging level: OFF, INFO,
WARN, ERROR, FATAL,
TRACE, DEBUG, ALL (this parameter
isn't case sensitive, so you can also use lower case names).
For doing temporal changes of logging level for particular class or package use the operation
setLoggingTempoporalLevel(String category, String temporalLogLevel, String
            timeOut)
. First two parameters are same as in setLoggingLevel(),
last one determinate how long this logging level should be used (after that amount of
time logging level would be set back to old level). timeOut parameter
should match regular expression: ^[0-9.]+[dhm]?$, for example if value
of timeOut is set for 1,5h that means that new logging level
would be active for one and half hour.
For loading a completely new configuration file use the operation loadNewConfigurationFile(String path).
This method is capable for both XML and properties configuration
files. There is only one parameter path that should contain absolute path to new
configuration file located locally on the server. Before performning any action that file is validated. First of
all the file extension (there are only two appropriate extensions: *.xml
and *.properties) is checked. The next validation step is different for both files, for
XML files its content is validated against the Log4j DTD or
schema then all output log files are checked that they exist and they are writable.
Properties configuration files are validated that they contain at least one
appender and each output file directory exists and is writable. These validations are done to
prevent Log4j to get into an inconsistent state.
Every single Servlet-Service makes his own node in JXM MBean tree. Such node contains below above functions.
Function getServletServiceMountPaths() returns Servlet-Service mount path.
Function getServletServiceConnections() returns an array of String contains
all connections names for given Servlet-Service. Every connection is represented by:
<short name> => <full qualified bean name>
Function getServletServiceInfo() returns information about Servlet-Service, such as author,
version, and copyright.
This module contains three smaller submodules:
| CacheMonitor |
| CacheBurstActions |
| CacheEntrysMonitor |
This submodule exposes all configured caches on with basic operations on every cache.
Operation listKey() returns list of all CacheKeys that are stored in this particular cache.
If you want remove single cache entry you should use operation removeKey(String), where parameter is
CacheKey name taken from listKey() result. This operation returns true
if it was successes otherwise it return false.
This module add set of operations that can be performed on all caches. You can find and remove all cache entry's which meet certain requirements, specified in operation parameters.
Operation listAllGreatherThen(long) finds all cache entry's in all configured cache's that size (in bytes)
is greather then value passed as a parameter.
Operation listAllSmalledThen(long) finds all cache entry's in all configured cache's that size (in bytes) is
smaller then value passed as a parameter.
Operation listAllOlderThen(String) finds all cache entry's in all configured cache's that are older then
value specified in a parameter. Parameter value must match regular expression: ^\d+[smhd]$ where each
letter stands for:
| s - second |
| m - minutes |
| h - hours |
| d - days |
Operation listAllYoungerThen(String) finds all cache entry's in all configured cache's that are younger
then value specified in a parameter. For parameter description see listAllOlderThen(String).
If you want to get more flexibility searching you can use list(long, long, String, String, Sting, Sting).
First two long parameters limits cache entry's size, their minimum and maximum size. Second two
String parameters limits cache entry minimum and maximum age (syntax is same as in
listAllOlderThen(Sting) and listAllYoungerThen(String) functions). Last two
String parameters are applicable only to ExpiresCacheKey instances and they limit
result entry's on minimum and maximum experience time of entry. Every result entry meets all limitations. For excluding one
(or more) limitation you must pas value -1 for long parameters and null or empty
String for rest parameters.
Operation clearAllGreatherThen(long) perform same search action as listAllGratherThen(long)
but it removes cache entry's that fulfilled requirements instead of listing them. It will return true if
every cache entry was successfully removed, after first failure of removing cache entry this operation will stop and return
false.
Operation clearAllSmallerThen(long) perform same search action as listAllSmallerThen(long)
but it removes cache entry's that fulfilled requirements instead of listing them. It will return true if
every cache entry was successfully removed, after first failure of removing cache entry this operation will stop and return
false.
Operation clearAllOlderThen(String) perform same search action as listAllOlderThen(String)
but it remove cache etry's that fulfilled requirements instead of listing them, this operation also require same parameter schema
as in listAllOlderThen(String). It will return true if every cache entry was successfully
removed, after first failure of removing cache entry this operation will stop and return
false.
Operation clearAllYoungerThen(String) perform same search action as listAllYoungerThen(String)
but it remove cache etry's that fulfilled requirements instead of listing them, this operation also require same parameter schema
as in listAllYoungerThen(String). It will return true if every cache entry was successfully
removed, after first failure of removing cache entry this operation will stop and return
false.
Operation clear(long, long, String, String, String, String) perform same search action and takes same parameters
as described above list(long, long, String, String, String) please see it if you are looking for detailed description.
You can add your own burst actions. It is very simple, just obtain instance of org.apache.cocoon.monitoring.cache.CacheBurstActions
from the container and you can perform any action on cache entry's using performActionOnCaches(long, long, String, String,
String, String, CacheAction) method. Meaning of each parameter in this method is same as in list(long, long, String,
String, String, String) and clear(long, long, String, String, String, String) methods, but there is one
additional parameter, it is implementation of CacheAction interface. This interface has only one method
performAction(Cache, CacheKey) and it will be executed on every cache entry that match passed parameters.
This module enables overview of cache entry's that are connected with specified pipeline. This module will only publish cache entry's for
those pipeline's that had jmx-group-id parameter set for unique value/name. This module also require additional refresh
action, it can be performed by user or it can be executed in some period of time eg every one minute. Behavior of refresh action can be
configured by CacheEntrysMonitorInitializer constructor parameter or on JMX.
AutoRefresh action can be enabled and disabled during runtime. This action will register new MBeans
that are connected with new cache entry's and unregister old MBeans that was connected with expired or removed
cache entry's.
For enable AutoRefresh action call operation enableAutoRefresh(long) where long
parameter is period time (in millisecond) between each refresh. This operation will stop previously configured AutoRefresh
action and run new with new time period.
Operation disableAutoRefresh() will stops actual running AutoRefresh action.
On each published cache entry you can perform that set of actions:
Operation getCacheKey() will return CacheKey connected with that entry.
Operation setCacheValue(String) will set new value of this cache entry.